Efficiently managing software deployments across an organization’s devices can be a challenging task. Microsoft Intune, a cloud-based management solution, offers powerful capabilities for deploying applications to Windows devices. However, the process can become cumbersome when dealing with multiple applications, dependencies, and updates. That’s where Chocolatey, a popular package manager for Windows, comes into play. By harnessing the capabilities of Chocolatey alongside Microsoft Intune, IT administrators can streamline the deployment process, simplify application management, and ensure a seamless software experience for their users. In this insight, we’ll explore how combining Chocolatey and Microsoft Intune can enhance application deployments, save time, and enhance overall productivity for IT teams.
Using Microsoft Intune for Deployment
One of the most time-consuming tasks with Microsoft Intune deployment is the application portion, where you package applications to deploy to your end-user machines. If the application is bundled as an executable (exe), the steps to get it into Intune are as follows:
- Grab the installation executable.
- Find the install commands.
- Setup detection rules by finding the install directory or registry key.
- Find the uninstall executable and any commands it has as well.
- Wrap the executable in an “.intunewin” format.
- Import the file into Intune.
- Configure the application with the install and uninstall commands as well as the directory it creates so Intune knows if it installed correctly or not.
This process may need to be replicated when the application is upgraded, and you want to push out the updated app to your Intune devices.
However, if we used Chocolatey, a package manager and installer for software packages, we could considerably speed up the Intune application package deployment process because we would no longer need to:
- Find any install commands.
- Grab the installation executable.
- Find the uninstall process and switches.
- Configure the application with any install or uninstall commands within the Intune platform.
If you decided to use Intune configuration PowerShell scripts, you also wouldn’t need to wrap anything in the “.intunewin” format or specify install directories. However, we suggest having your applications all under the Intune Applications blade instead of the configuration blade for ease of management and administration purposes. This method will also allow you to specify Chocolatey as a dependency for your applications. This way if Chocolatey isn’t installed on the targeted device and you are installing Visual Studio Code using Chocolatey, it will automatically install it prior to the Visual Studio Code installation.
Deploying Chocolatey with Intune
Using Chocolatey as the package manager for installing all your applications via Intune saves you time and energy by eliminating the manual process of prepping you’re your installs and researching any command-line switches to install or uninstall. This package manager also helps you avoid re-packaging the application when it needs updating.
Step 1:
Create your Chocolatey deployment for Intune. In the same directory as your IntuneWinAppUtil.exe from the Microsoft Win32 Content Prep Tool, create a new directory called Chocolatey.

Save the PowerShell script below in your Chocolatey directory and name it install.ps1.
Set-ExecutionPolicy Bypass -Scope Process -Force; [System.Net.ServicePointManager]::SecurityProtocol = [System.Net.ServicePointManager]::SecurityProtocol -bor 3072; iex ((New-Object System.Net.WebClient).DownloadString('https://chocolatey.org/install.ps1'))In PowerShell or CMD, navigate to the directory with the IntuneWinAppUtil.exe and start the executable (to change directory in PowerShell or CMD simply type in "cd" followed by the targeted directory). To run the executable simply type in.\IntuneWinAppUtil.exe
Step 2:
Specify the source folder that has our install files, the setup file (which is our install.ps1 file), and the output folder where it will spit out the “.intunewin” file.

Here we see that it successfully created our “.intunewin” file to import into Intune.

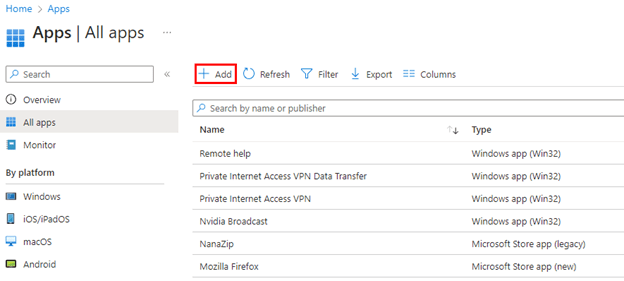
Next, in Intune blade go to Client Apps > Apps > + Add.
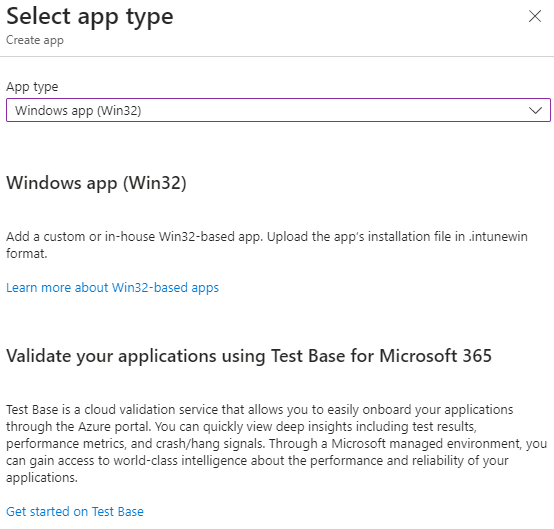
Select Windows App (Win32)
Step 3:
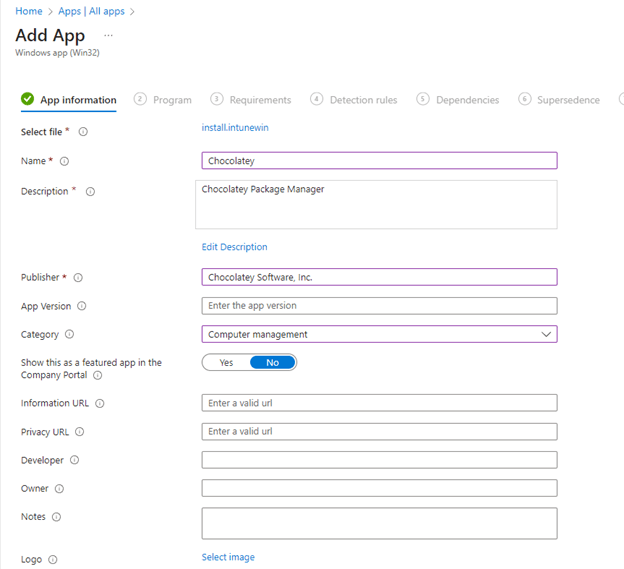
Import the install.intunewin file you created earlier. In the App Information pane, you can modify the application info, including name, description, publisher, and even give it a proper logo to display in the Company Portal.
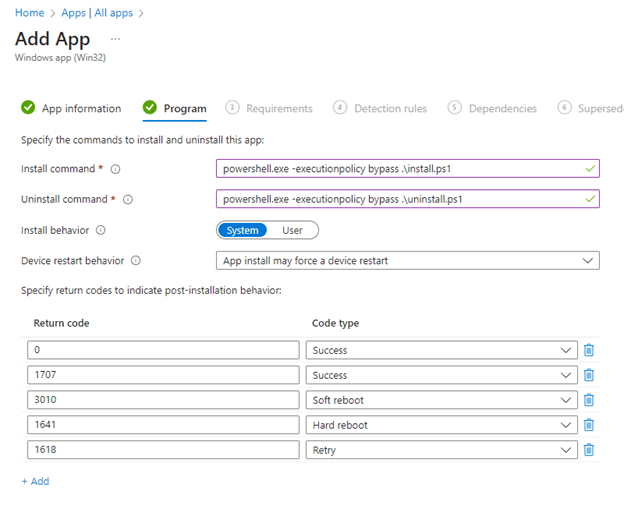
For the install command put:
powershell.exe -executionpolicy bypass .\install.ps1You can put anything for the uninstall command as we did not configure an uninstall script. If you did create one, you could dot-source it like the install.ps1 file.
Note: We don’t need to specify silent install switches with chocolatey or its packages. This is because it’s all done silently by default.
Step 4:
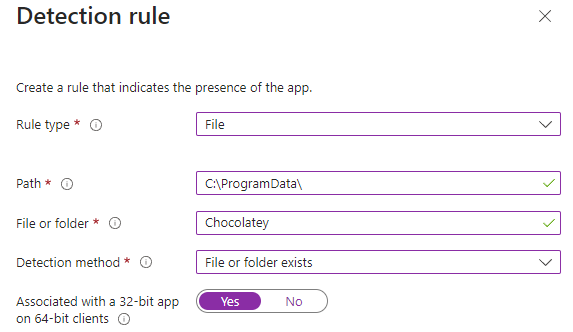
For our detection rules, we will tell Intune that Chocolatey is installed if the Chocolatey folder is present under C:\ProgramData\.
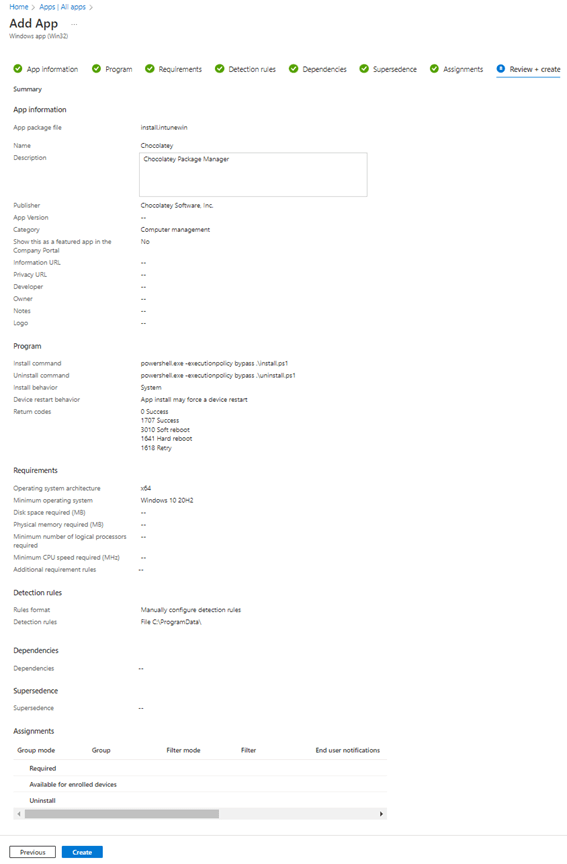
In the end, we can review our new Intune application.
Installing Applications via Intune and Chocolatey
In the following section, I will show you how to combine Chocolatey and Intune to install and uninstall applications. The method is the same for each application, so if your application is not listed, you can follow the same instructions for your app. You will need to locate the package on the Chocolatey repository.
Google Chrome
Looking in the Chocolatey repository, you will find the install command for Google Chrome is: choco install googlechrome
The install script (install.ps1) for Google Chrome will look like the following:
$localprograms = choco list --localonly
if ($localprograms -like "*googlechrome*")
{
    choco upgrade googlechrome
}
Else
{
    C:\ProgramData\Chocolatey\choco.exe install googlechrome -y
}
You can put the IF statement in there in case it’s already installed or tell Intune to update the application.
An example uninstall.ps1 file will look like this:
choco uninstall googlechrome -yRun the Microsoft Win32 Content Prep Tool through PowerShell or CMD just like when you packaged Chocolatey.
Finally, you configure your new Win32 application in Intune the same way we did with Chocolatey. The only change is setting the detection rules.
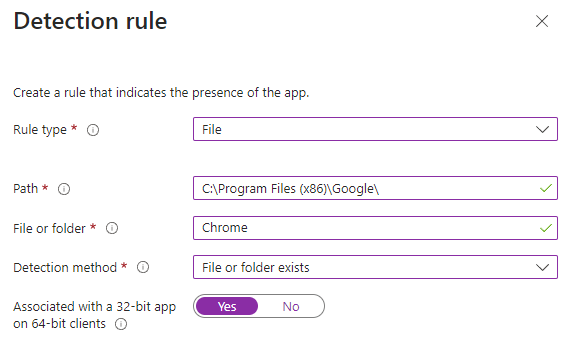
Please note that for some applications you will need to add a -file or a -command in the install command. The result will look like this: powershell.exe -executionpolicy bypass -file .\install.ps1 or powershell.exe -executionpolicy bypass -command .\install.ps1.
Adding an Application Dependency
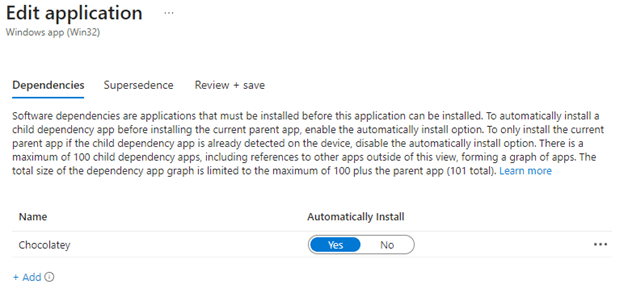
One of the benefits of deploying the application as a Win32 is that we can specify application dependencies. Since we are deploying applications using Chocolatey, we want to set the Chocolatey app as a dependency, so if it’s not found on the machine, it will auto-install it for you. In the Intune Portal, you can edit the application and select Dependencies and specify the Chocolatey app and force it to auto-install if it is not present. You can also specify dependencies when you are creating the application in Intune.
Conclusion
Leveraging Chocolatey as a package manager for Microsoft Intune application deployments opens up a world of possibilities for IT administrators. By integrating these two powerful tools, organizations can experience significant benefits in terms of time savings, streamlined deployments, and improved software management. Chocolatey’s vast repository of packages, automatic dependency handling, and version control capabilities alleviate the complexity of application deployments, allowing IT teams to focus on strategic tasks and deliver a better user experience. Whether it’s deploying new applications, managing updates, or ensuring compliance, the combination of Chocolatey and Microsoft Intune empowers organizations to maximize efficiency, increase productivity, and stay ahead in the ever-evolving landscape of software management. Embrace the power of Chocolatey and Microsoft Intune and unlock a seamless and scalable approach to application deployments that will drive your organization forward.
Tips you should know
- To Setup Detection Rules for Applications that Install Under the User. To setup your detection rule correctly simply replace the users name with %username%.
Here’s an example: C:\Users\%username%\AppData\Local\ - To Upgrade or Replace the Application. Within the “new” version of the application under Supersedence you will specify the “old” application that you wish to supersede. If you want to perform an upgrade of the app you want to supersede then you don’t need to toggle the uninstall option if you wish to replace it then toggle the uninstall option.
- To Troubleshoot the Installation, each installation and uninstallation creates a log. These are located in “C:\Program Files\MEM\EndpointManager\Log” they contain the complete transcript of the installation.
About HomeTree Digital
HomeTree Digital is a full-service digital marketing agency for financial services. We specialize in branding & creative, videography, web & mobile development, integrations & automations, email marketing, organic & paid social media marketing, SEO, distribution, reporting & analytics, and tying it together through strategy. Reach out to us today for more information on how we can help you.
HomeTree is defined as a wise resourceful home that provides knowledge, instills inspiration, encourages creativity, and protects whilst harmoniously connecting its residents through its branches and roots to the outer world. This accurately describes the approach we take when it comes to our clients—we believe in excellent customer service and prioritizing you, whilst providing you with the know-how for you to succeed in this rapidly evolving digital world.


